Sunday, 15 November 2015

45 - A new addition

 Wow - four months have gone by and I haven't posted a thing. Well to tell the truth I haven't done much to the bike over the summer. I eventually left the tank with Brian the boat repair man and it's kinda been sitting there since. The rest of the bike is pretty complete so there wasn't a lot to do and I get easily side tracked with other things.

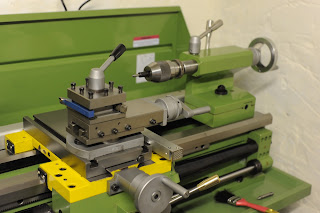
 I took a notion to buy a lathe for the workshop. After studying the internet I ordered a 290V from Warco. This is about as big as the variable speed model bench lathes go. It has a 6" swing and 28" between centres. 1 1/2" spindle bore and 3MT tailstock, so it should do most jobs on the motorbike for me. Also it comes with 3 and 4 jaw chucks, face plates steadys etc. 

  Warco 290V lathe


It arrived on a pallet inside a packing crate, luckily the shop at the end of the road has a forklift so he was able to lift it off the lorry and set it in my garage. When it came time to install it I borrowed an engine lift from a mechanic and put her in place in the corner of my shed.


I've been very please with it so far. It's accurate, the digital read out makes things real easy, and you can machine at a decent rate with the power feed, so it's no mickey mouse machine even if it was built in China. 


Wednesday, 24 June 2015

44 - Tank repairs

 This is one of the last big jobs to tackle. The problem I faced was that before I could get the tank painted I needed to do something about the interior. Twenty odd years ago I had put a Petseal tank sealer solution into it, but this had split and cracked. I didn't think pouring in more on top of it would be satisfactory and there was no way to completely remove the old stuff because of the limited access.

 So I had no real choice but to cut it open. Before I did so I found a local boat repair man who specialises in fibreglass and gelcoat repairs. He's going to glass it back together for me and we'll find the best product for recoating the interior. 

 It was a dusty job but not too difficult to open it up. I cut in to it with a thin disc about half an inch from the edge then went round the curved tunnel with a hacksaw blade. Once open the old petseal came off in big pieces, only here and there was it well attached. 


43 - Speedo Bracket

 Yet more fabrication. This time a bracket to hold the speedometer. Looking at the drawing in the parts book I tried to copy its design. I wanted it to hold the speedo in out of the way, really close to the frame. 

 I marked it out from a piece of 4mm stainless steel. ( I love stainless - its the only way to make stuff that's going to live its life outdoors on a bike.)


 Once it was filed up I used a bit of heat to twist it into shape. It worked out really good, with minimal clearance.


42 - Guard fitted


 I finished the guard by fabricating a little stay and getting it welded on. I know the original was riveted but I opted for welding.


 Next on the list of things to do was make a brake rod. I bought a piece of 6mm stainless and bent and threaded the ends. I didn't like the way it just touched against the spring of the shock absorber so I put a little joggle in it to make a bit of clearance, looks much better now.


 I made the winged adjuster nut from stainless steel. Just a piece of bar drilled and threaded, then two little slots milled to hold the wings in place while I brazed them in. The front end was radiused with a cutter to stop it turning against the barrel. 


Monday, 1 June 2015

41 - Chain guard cont.

 After forming the curve on the top of the guard I marked it out then cut and filed it to shape.

 It needed a dimple at the front to allow for the head of a screw, so I made a press tool from a couple of bits of scrap bar. It worked out pretty well.


Wednesday, 6 May 2015

40 - Making a Chain Guard

 I thought I'd better make a start at making a chain guard. A friend in work cut me a sheet of 1.5 mm aluminium. The folders we have only make square folds so I took it home to come up with something myself.
 I had a rummage round the shed and gathered a few bits together. 


 Some plywood and 22 mm copper tube was enough to make a simple folder and it worked very well.


 I already made a template from some card so I'll use that to mark it out ready for cutting and filing.

Sunday, 12 April 2015

39 - Rebuilding #1

 Now that I have most of the bits ready it's time to start rebuilding the bike. 
 The new stand fits very well. I was going to make a jig for John to help when he welded in the pivot bracket, but he said "don't bother I'll just hold it position myself" It turned out absolutely spot on. It has a nice line parallel to the swing arm and the spring has good clearance with the tyre.


 The springs look nice now that the're chromed and I have a new chain fitted over the old sprockets, but they were ok. The tensioner and torque arm have been zinc plated.


Tuesday, 31 March 2015

38 - finishing the brake

 After a comment from Michael I thought I could remember there once was a big rubber seal which sat in the circular groove beside the brake shoes. I guess the idea was to make a seal to prevent water and dirt entering, but how well it worked was debatable. I would think that unless a lick of grease was kept on it, it would soon wear flat.

 Anyway the means and materials were at hand to make something so I did just that and fitted it. Its made from a piece of polycord drive belt, melted with an iron and joined together then the excess trimmed off.


Sunday, 22 March 2015

37 - Setting the Points

 The engine was up on my electrical workbench this afternoon. I hooked up an old AVO meter and set the points. All very straight forward using a DTI for accuracy.

Points gap 0.4 mm
Opening 3mm before TDC


Sunday, 8 March 2015

36 - Brake re-line


  Last week I had left my brake shoes into Belfast Brake Specialists


 The brake drum in the back wheel was pretty well worn and at first I had thought about boring out the remainder and making a new cast iron liner to go inside. Since I've never tackled this job before I wasn't too sure how it would work out, nor did I know just what degree of interference fit I would need between it and the hub for it to be successful, although I could make a good guess, it was still going to be a lot of work. 

 Previously to get a better brake I had attached shims to the faces of the shoes to try and move them out closer to the drum and give me a shorter pedal travel. There had been so much travel in the pedal it would touch the frame and I didn't want this happening again just to ruin the new paint work.

 I decided instead to go about it a different way by relining the shoes with thicker material and skimming them to suit. By measuring the internal diameter of the hub I reckoned a 5mm thick lining to be about right.

 I explained all this to Trevor at BBS but he only carried 4.7mm (3/16") or 6mm thick material. Based on the grounds it would be less work I picked the 3/16" material but changed my mind and phoned Trevor the next morning to get him to put the 6mm material on. Even though he had started the job that wasn't a problem, and I picked them up the other day looking like new again. It's always good when you can get excellent service like this from someone local. 

 The next day I made a simple mandrel to hold the brake plate, mounted the shoes and tied them together with a piece of wire and a tie wrap to pull them tight against the cam then proceeded to turn them down to size.


The material turned down very nicely to leave a good surface. The internal diameter of the hub is 141mm and I made these shoes 140.8mm 

 I wasn't sure if this was going to be enough clearance but when I assembled everything the wheel rotates freely without even the faintest sound of the shoes rubbing. So I don't think I could make them any better other than cut grooves across the shoes to displace water, but then I don't plan to be competing on the bike again so I'll leave them as they are.


Thursday, 26 February 2015

35 - Getting Started Again

 Things have been slow over the winter. It is just too cold to feel like going out to do any work in the shed, but now I have the frame back and want to make some progress again.

 Clifford made a good job on the frame, it's done in base coat and lacquer which is the way he wants to paint the tank when the time comes. We choose Ford Silver Fox as we couldn't get the crystal silver PPG colour.


 I've left in some parts for chrome and zinc plating, and the rear shoes for re-lining so I hope to get them back next week then get the wheels into the frame.